
I will guide you trough every step of it!
You can find the wallpaper here in my Dropbox
And the Metro icons, in 2 colors - Dropbox
You will need them for the setup.
Also necessary apps are Minimalistic Text, Desktop Visualizer, Extended Controls, WP7 Lock.
I'm using Launcher PRO +.
And let's go:
1. Screen for beginning:


Now tap OK and you have your first Windows 8 style widget on your screen!
Place it on the left top corner of your first homescreen.

Name: Commu; untick Show Background; Vertical block>Bottom; Horizontal block>Right; Horizontal text>Right; Predefined layout>Custom; Text Style - Normal - Font family>segoeuil Size>46dip Color>transparent white (68FFFFFF).
In the Custom layout: add>misc>static text and set the style to Normal. Type "Commu" in the static text field>ok and place the widget on the 2nd row on the right side of the screen:

Settings:
Name: nity; untick Show Background; Vertical block>Bottom; Horizontal block>Left; Horizontal text>Left; Predefined layout>Custom; Text Style - Normal - Font family>segoeuil Size>46dip Color>transparent white (68FFFFFF).
In the Custom layout: add>misc>static text and set the style to Normal. Type "nity" in the static text field>ok and place the widget on the 2nd row on the left side of the screen:

Settings:
Name: Communit; untick Show Background; Vertical block>Bottom; Horizontal block>Right; Horizontal text>Right; Predefined layout>Custom; Text Style - Normal - Font family>segoeuil Size>66dip Color>white (FFFFFFFF).
In the Custom layout: add>misc>static text and set the style to Normal. Type "Communit" in the static text field>ok and place the widget on the 1st row on the right side of the screen:

Minimalistic text 3x1(hor)
Settings:
Name: Med; untick Show Background; Vertical block>Bottom; Horizontal block>Right; Horizontal text>Right; Predefined layout>Custom; Text Style - Normal - Font family>segoeuil Size>46dip Color>transparent white (68FFFFFF).
In the Custom layout: add>misc>static text and set the style to Normal. Type "Med" in the static text field>ok and place the widget on the 2nd row on the right side of the screen:

Settings:
Name: ia; untick Show Background; Vertical block>Bottom; Horizontal block>Left; Horizontal text>Left; Predefined layout>Custom; Text Style - Normal - Font family>segoeuil Size>46dip Color>transparent white (68FFFFFF).
In the Custom layout: add>misc>static text and set the style to Normal. Type "ia" in the static text field>ok and place the widget on the 2nd row on the left side of the screen:

15. 2nd widget on this screen: Minimalistic text 2x1(hor)
Settings:
Name: y; untick Show Background; Vertical block>Bottom; Horizontal block>Left; Horizontal text>Left; Predefined layout>Custom; Text Style - Normal - Font family>segoeuil Size>66dip Color>white (FFFFFFFF).
In the Custom layout: add>misc>static text and set the style to Normal. Type "y" in the static text field>ok and place the widget on the 1st row on the right side of the screen:

Settings:
Name: Media; untick Show Background; Vertical block>Bottom; Horizontal block>Left; Horizontal text>Left; Predefined layout>Custom; Text Style - Normal - Font family>segoeuil Size>66dip Color>white (FFFFFFFF).
In the Custom layout: add>misc>static text and set the style to Normal. Type "Media" in the static text field>ok and place the widget on the 1st row on the right side of the screen:


Add new Desktop Visualizer widget 2x2 and place it on the 3rd and 4th rows on the left side of the screen:


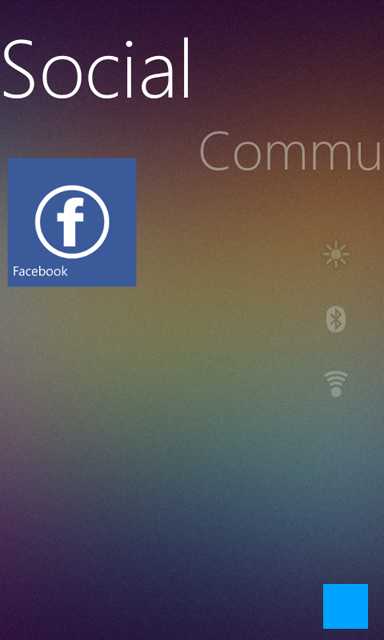
19. Now add the same widget next to facebook's panel for your messenger app:


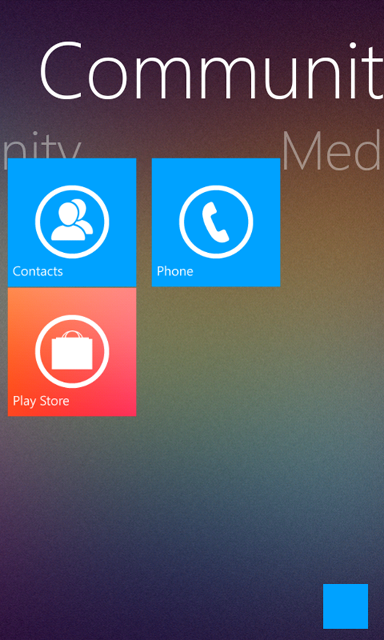
22. On the 2nd screen you have to use Desktop Visualizer again - 6 widgets, size - 2x2: Contacts, Phone, Play Store, SMS, Internet and Lock.


25. Now add one more Minimalistic Text widget for the clock:


26. The last action is to go in Preferences>Homescreen Settings and set the number of rows to 7:

After all of this customization you have your new Windows 8 Android Phone look!

What do you think about this tutorial? Use the comments for feedback.


Wow very impressive!! But how did you get that font?
ReplyDeleteThank you. I'm not sure where I found it.
Deletehow did you install the font on your phone? thanks in advance..
DeleteIt isn't installed on the phone, only in minimalistic text. Place your font in some specific folder and go in minimalistic text preferences>global settings>fonts folder and select the folder.
DeleteYour #10 instruction should have Horizontal block>Left and not to the right
ReplyDeleteNo.10 is for "Commu" and it should be on the right side of the screen, not on left.
DeleteI actually meant #11
Deletethis is really awesome... can you pls reupload win8 panels?
ReplyDeleteThank you! Now the link is fixed.
Delete